
PQM Training Setup Wizard
PQM Training / Setup Wizard
First Setup
Setup Wizard
Guide a new installation through minimum configuration before production starts.
Production OSWordPress CoreRole-based workflowTraining Center
Training pages
Training HomeProduction DashboardCore ConfigurationTasks and Add TaskDepartments and WorkflowCalendar and Standard GanttEmail Queue and CommunicationReports and KPIModules / MarketplaceSetup WizardLicense and Demo ModeHelp and TrainingAdmin PanelClient PanelEmployee Worker PortalShop Manager / SupervisorImplementation Checklist
Purpose in plain language
Setup Wizard helps a new PQM installation become usable without making the administrator hunt through every settings page. It should guide the user through the minimum decisions required before production starts.
For a beginner, the wizard is the first run checklist: basic company setup, departments, statuses, roles, email settings, optional WooCommerce connection and sample task/testing.
Where to click
After installing/activating PQM, open WordPress admin.
Click PQM in the left menu.
Open Setup Wizard or use the first-run notice/button if shown.
Complete steps in order. Do not skip departments and statuses unless demo defaults are acceptable.
After finishing, create a test task and verify dashboard, task list and portal visibility.
Recommended wizard steps
| Wizard step | What user decides | Why it matters |
|---|---|---|
| Welcome / mode | Production setup, demo setup or staging/test setup. | Prevents users from mixing demo and real production behavior. |
| Company profile | Company name, contact email, logo or basic identity. | Used in admin presentation, emails and future documents. |
| Departments | Which production stages exist. | Tasks need responsibility and reports need department data. |
| Statuses | Which progress states are used. | Dashboard, filters, emails and reports depend on status logic. |
| Roles / permissions | Who can manage, work, view or configure. | Protects admin area and makes portals useful. |
| Email basics | Enable/disable task created and completed notifications, sender info. | Prevents accidental spam and helps customer communication. |
| WooCommerce / orders | Whether tasks can be created from WooCommerce orders. | Needed for shops where online orders become production jobs. |
| First test | Create sample task and verify screens. | Confirms the setup is not only saved but operational. |
How to run the wizard safely
Prepare a short list of real departments before starting.
Use simple default statuses first. Advanced status logic can be refined later.
Do not invite every employee before you test permissions with one worker account.
If email triggers are available, use a test customer address first.
Finish the wizard, then manually open Dashboard, Add Task, Task List, Calendar and Reports to check every page loads.
Write down any missing company-specific choices and return to Core Configuration later.
What to do after the wizard
Technical verification
- No critical PHP/WordPress errors.
- Pages load for the correct roles.
- Cache does not hide fresh data.
- Email system sends test messages.
Business verification
- Departments match real workflow.
- Task instructions are understandable.
- Manager knows daily dashboard routine.
- Worker knows how to update their stage.
Good practice
- Use the wizard for the first setup, but use Core Configuration for later precision work.
- Do not skip testing with realistic data. A perfect-looking empty setup is not enough.
- Save screenshots or notes of final configuration for future administrators.
- Run the wizard in staging first when working on an important existing site.
Screenshot reference
How to use screenshots
Click any screenshot to open it in a new tab. This is useful for zooming in while following the step-by-step instructions.
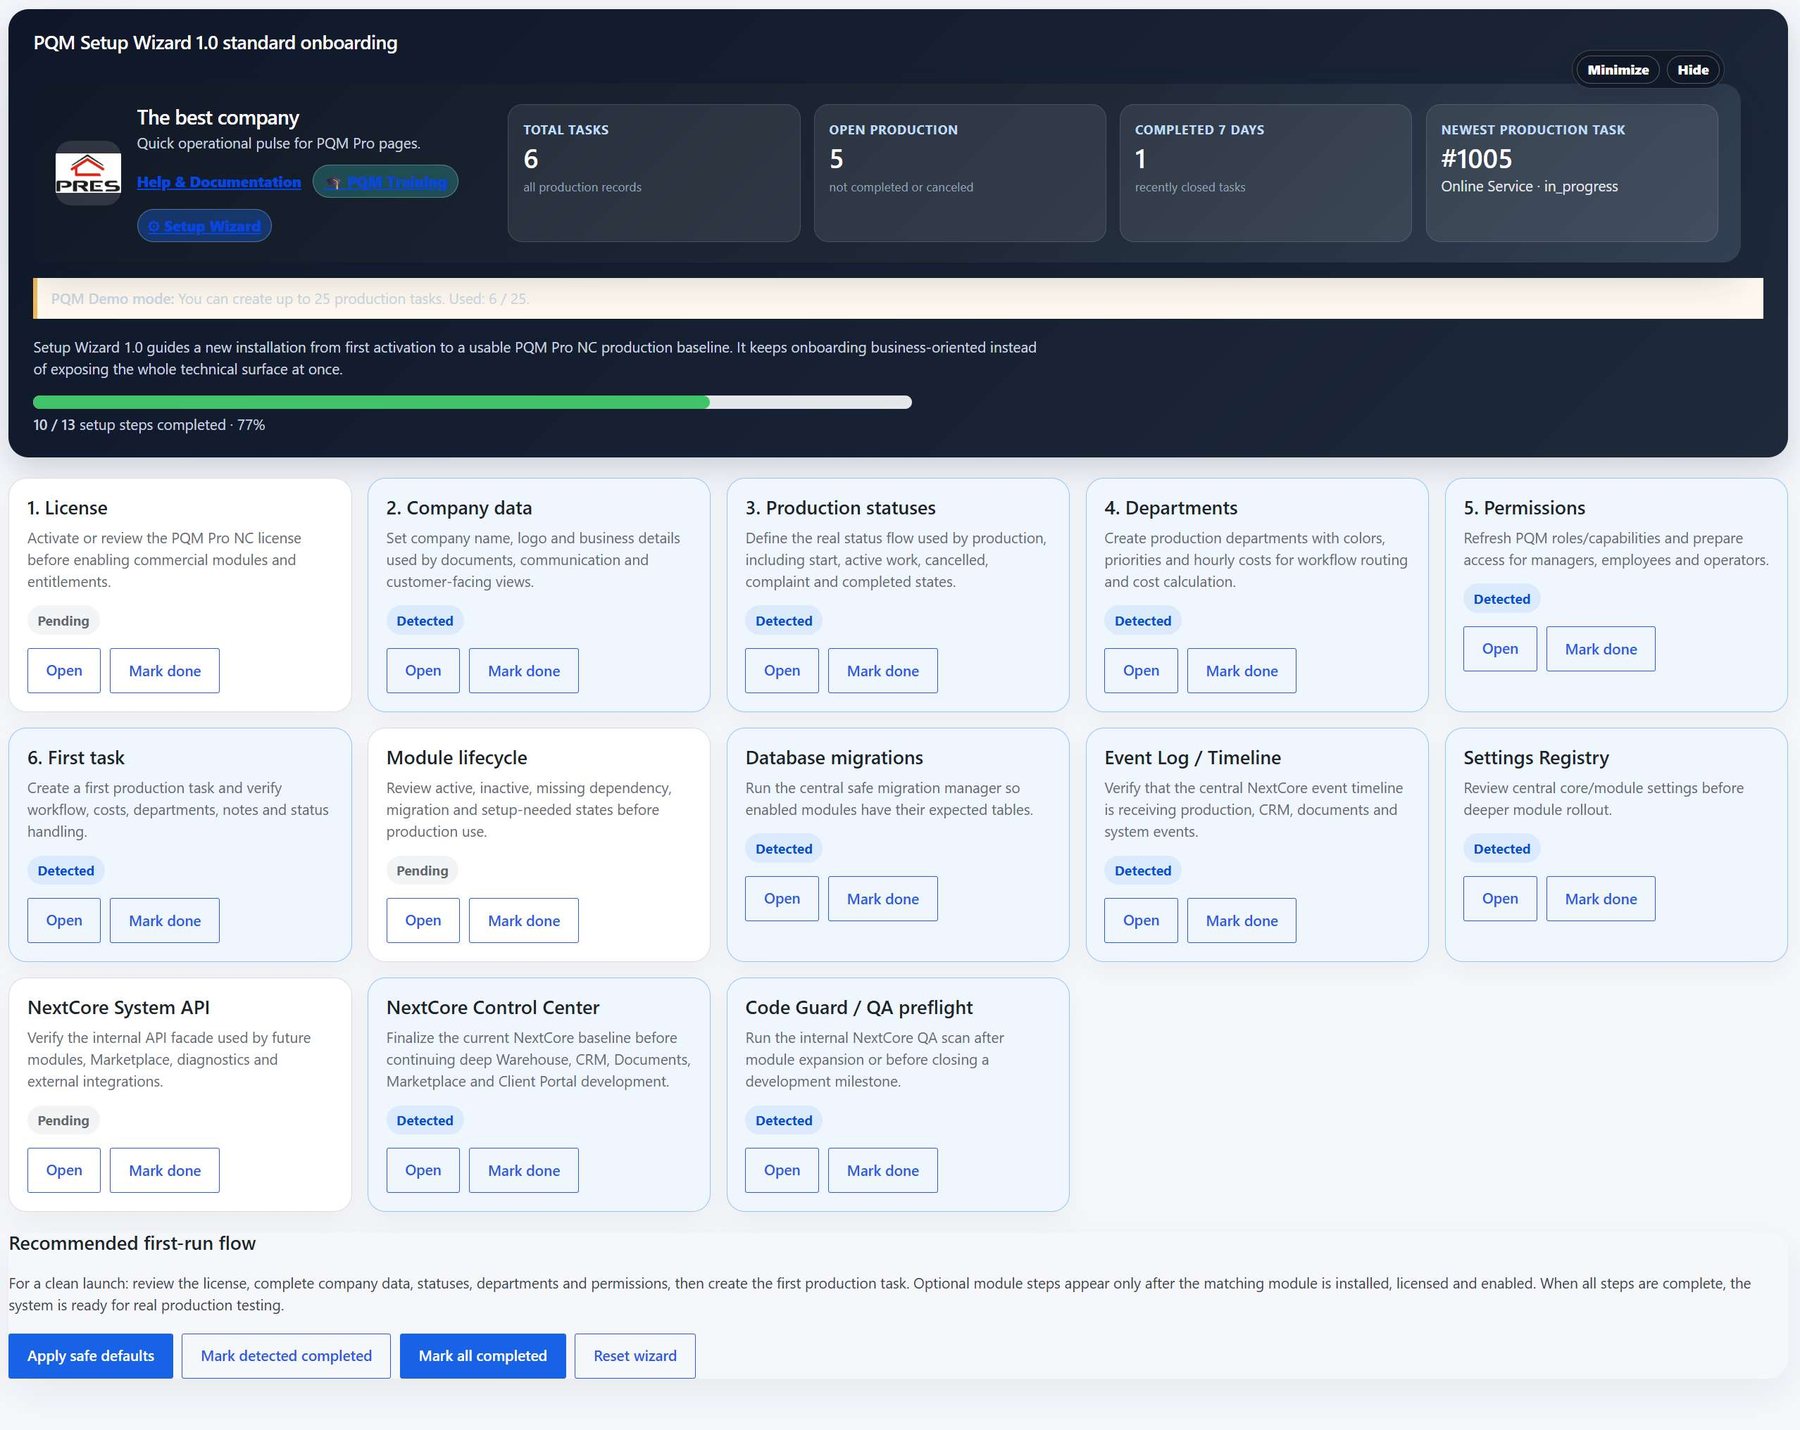
Setup Wizard
Setup Wizard reference. Use it to explain first-run configuration and what should be checked after the wizard finishes.
Who should use this screen?
AdministratorConfigures PQM, licenses, modules, health checks, capabilities and technical maintenance. This role should be limited to trusted users.
Manager / Shop ManagerControls daily production, creates tasks, checks reports, follows deadlines and supervises employee work without changing technical settings.
Production EmployeeWorks mainly in the frontend Employee Portal and updates assigned production stages without using the WordPress admin area.
Troubleshooting for beginners
| Symptom | Simple explanation | What to check first |
|---|---|---|
| The page looks empty | The system may have no demo data yet, or the current user may not have access to the required role/capability. | Create one test task, assign a department, then refresh the screen. Also check the user role. |
| A button opens a login page or My Account | The visitor is not logged in or the page is using a frontend-safe route that requires authentication. | Log in with a test user that has the expected role. Check whether the shortcode/page is visible only to logged-in users. |
| Data exists but does not appear in a report/chart | Filters, date range, status rules or completion dates may exclude the task. | Clear filters, expand the date range and verify that the task has the status/date required by the report. |
| Something changed but the screen still shows old data | Browser cache, WordPress cache or AJAX response cache may show old information. | Refresh the page, clear cache for this page and test in an incognito window before debugging code. |
| The layout is broken on a small screen | Wide tables and timelines need horizontal space; this is normal if the content remains readable. | Use the mobile breakpoint, keep cards in one column and allow horizontal scroll only inside tables/timelines. |
Readiness checklist
A beginner can explain what this screen is for after reading the first two sections.
The correct role can open the screen and restricted roles cannot see unsafe actions.
There is at least one realistic test task visible in the screen.
Buttons and links go to the expected place.
The empty state explains what to do next instead of looking broken.
The page remains readable on tablet and mobile.
Related training pages
Training HomeTraining overview and recommended learning path.Production DashboardDaily command center, active tasks, metrics and quick actions.Core ConfigurationSystem settings, statuses, roles, capabilities and safe defaults.Tasks and Add TaskHow to create, read and update production tasks step by step.Departments and WorkflowHow production stages and responsibilities are modeled.Calendar and Standard GanttDate planning, deadlines and visual timeline overview.Email Queue and CommunicationCustomer messages, email queue and communication templates.Reports and KPIKPI, margins, bottlenecks, exports and production analysis.